In addition to this DS4OERS course website, we use an online learning system called “Moodle” to support your learning. The OER Foundation has donated use of the OERu’s Moodle site for the purpose of this course.
Through Moodle, you can:
On this page you will find all you need to know about using Moodle.
Create a Moodle account and enrol in the DS4OERS course site
- Go to the OERu Moodle site by using this link: https://moodle.oeru.org/course/view.php?id=51
- Create an OERu Moodle account, following the instructions on the OERu support site
- Keep a record (in a private place) of the username and password you have just created – you will need them each time you return to the Moodle site.
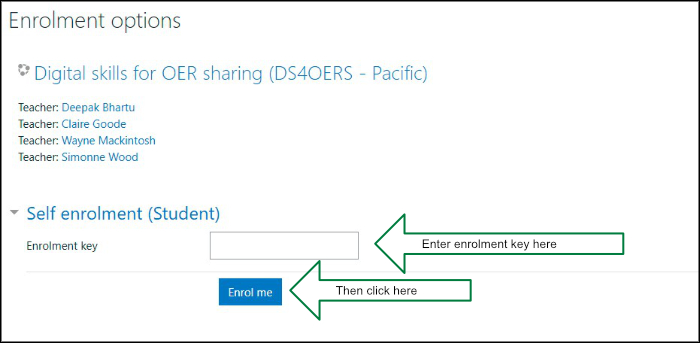
- On the Enrolment options screen that appears, enrol in the DS4OERS Moodle site:
- Enter the Enrolment key: ppodl (all lowercase)
- Click on Enrol me
We suggest you save the link to the Moodle site as a ‘bookmark’ or ‘favourite’ in your internet browser, so you can find it again easily. See How to create an internet favourite or bookmark for instructions.
Log in to Moodle
Once you have created your Moodle account and enrolled in the course, you can log in to Moodle again any time you want:
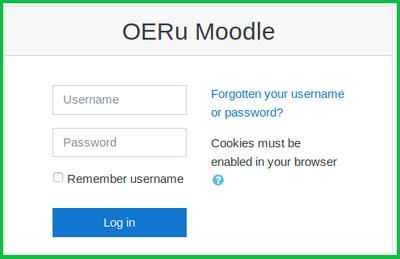
- Go to the OERu Moodle site, using the same link as before: https://moodle.oeru.org/course/view.php?id=51
- On the log-in screen (see image below), enter your Username and Password, then click on the “Log in” button.
Find your way around Moodle
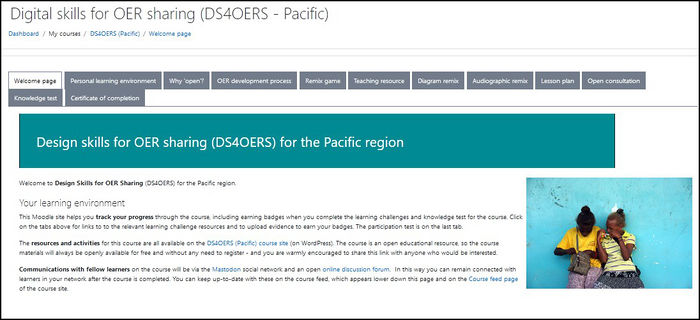
When you first go into the DS4OERS Moodle site, you will find yourself on the Welcome page, which will look similar to the screenshot below. The layout may be a little different, depending on your screen size.
Across the top are ‘tabs’ which take you to the different Moodle pages. The page that you are on is shown by a white tab (e.g. ‘Welcome page’ in the screenshot), and all the other tabs are grey. You can move between pages by either:
- Clicking on the tab that you want or
- Using the link at the bottom right of each page, which takes you to the next page
Each of the learning challenge pages contains a link to the relevant section of the course materials.
On the pages for Teaching resource, Diagram remix, Audiographic remix and Lesson plan, you will also find the place to share and view the resources you and your fellow learners have made for this course.
Upload a learning challenge resource
In the course, you are asked to create and share an openly licensed educational resource for each of these learning challenges:
To upload a resource for a learning challenge:
- Go to the relevant learning challenge page in Moodle, for example Audiographic remix
- Click on the Upload link, which is the second link on the page (see screenshot below)
- Check that your resource meets the criteria for sharing
- Click the Add submission button at the bottom of that page
- Tick the honesty statement to confirm that the resource is all your own work, except where you have acknowledged the work of other people
- Upload your file(s)as required for that learning challenge
- Click Save changes

Explore other learners’ resources
Once approved, all the resources uploaded by learners on this course will be visible to other learners on the relevant learning challenge page in Moodle.
For example, to see what other learners have shared for the Audiographic remix learning challenge:
- Go to the Audiographic remix page in Moodle
- Click on the third link: “View and download audiographic videos” (see screenshot below)
- Click on the link to any resource that you are interested in
- Choose whether to open it or save it to your computer (if you just want to view it first, click “Open”, but if you know you want to download it, click “Save”)

Track your progress
Moodle offers you the opportunity to keep track of your progress by using the Completion progress bar. This appears at the side or at the bottom of your Moodle page, depending on the size of your screen. It looks like this:

Each small box represents an activity in the course.
- Hover your mouse over each box to see what it is
- Click the box to go to that activity
Blue means the activity is not complete yet
Yellow means you have uploaded a resource but it has not been marked yet
Green means an activity has been completed
Completion is shown automatically for uploading your resources and the knowledge test. To indicate your progress through the nine learning challenges, you need to tick the box next to the link to the relevant learning materials when you have finished that learning challenge.
For example, on the Audiographic remix page:

It is your own choice whether you want to tick the boxes next to the learning challenge links and keep an eye on the completion progress bar. Although teachers can also see your completion progress bar, it makes no difference to your success in the course – it is simply there to help you visualise how far you have got through the course and how much is left to do.
Take the knowledge test
See Knowledge test for information on how to take the Knowledge test in Moodle and earn your Participant badge.
Earn digital badges and a certificate of completion
See Certification overview for information on earning digital badges and a Certificate of completion through Moodle when you have successfully completed the course.
In addition to this DS4OERS course website, we use an online learning system called “Moodle” to support your learning. The OER Foundation has donated use of the OERu’s Moodle site for the purpose of this course.
Through Moodle, you can:
On this page you will find all you need to know about using Moodle.
Create a Moodle account and enrol in the DS4OERS course site
We suggest you save the link to the Moodle site as a ‘bookmark’ or ‘favourite’ in your internet browser, so you can find it again easily. See How to create an internet favourite or bookmark for instructions.
Log in to Moodle
Once you have created your Moodle account and enrolled in the course, you can log in to Moodle again any time you want:
Find your way around Moodle
When you first go into the DS4OERS Moodle site, you will find yourself on the Welcome page, which will look similar to the screenshot below. The layout may be a little different, depending on your screen size.
Across the top are ‘tabs’ which take you to the different Moodle pages. The page that you are on is shown by a white tab (e.g. ‘Welcome page’ in the screenshot), and all the other tabs are grey. You can move between pages by either:
Each of the learning challenge pages contains a link to the relevant section of the course materials.
On the pages for Teaching resource, Diagram remix, Audiographic remix and Lesson plan, you will also find the place to share and view the resources you and your fellow learners have made for this course.
Upload a learning challenge resource
In the course, you are asked to create and share an openly licensed educational resource for each of these learning challenges:
To upload a resource for a learning challenge:
Explore other learners’ resources
Once approved, all the resources uploaded by learners on this course will be visible to other learners on the relevant learning challenge page in Moodle.
For example, to see what other learners have shared for the Audiographic remix learning challenge:
Track your progress
Moodle offers you the opportunity to keep track of your progress by using the Completion progress bar. This appears at the side or at the bottom of your Moodle page, depending on the size of your screen. It looks like this:
Each small box represents an activity in the course.
Blue means the activity is not complete yet
Yellow means you have uploaded a resource but it has not been marked yet
Green means an activity has been completed
Completion is shown automatically for uploading your resources and the knowledge test. To indicate your progress through the nine learning challenges, you need to tick the box next to the link to the relevant learning materials when you have finished that learning challenge.
For example, on the Audiographic remix page:
It is your own choice whether you want to tick the boxes next to the learning challenge links and keep an eye on the completion progress bar. Although teachers can also see your completion progress bar, it makes no difference to your success in the course – it is simply there to help you visualise how far you have got through the course and how much is left to do.
Take the knowledge test
See Knowledge test for information on how to take the Knowledge test in Moodle and earn your Participant badge.
Earn digital badges and a certificate of completion
See Certification overview for information on earning digital badges and a Certificate of completion through Moodle when you have successfully completed the course.
Project lead
Supported by
Development Partner