To complete this challenge, read the following scenario:
You have been asked to design a course for your online class and you need to select the best educational tool to communicate with your online learners. For this, you need to lay out and analyse your ODFL ecosystem using a mind map. A mind map is a drawing used to show words, ideas, tasks or other things. Everything is written around a word or idea in the middle. This word or idea is the main topic and linking and branching out from this main topic are ideas relating to it.
Task:
The task for this learning challenge is to prepare and upload a mind map, which should clearly show the following:
- Tools that are available / accessible to you
- Tools that are accessible to your students
- What makes each tool a good option – how can you use each to present your content / communicate with your students?
- The drawbacks associated with using each tool
The Steps (7) for Designing Your Mind Map:
There are many mind mapping softwares available online. You may use any software that you find convenient. However, one free software we suggest is “MindMup”. The instructions below show how you can use the “MindMup” software to design your mind map.
Step 1: Click on this link to access the mind mapping software: https://www.mindmup.com/
Step 2: On the home page, click on “Create a Free Map”.
A mind map deigning pane will open. This is where you will create your mind map.
Step 3: In the first node that appears, double click or press space and type “My ODFL Communications Ecosystem”
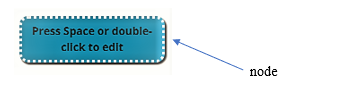
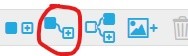
Step 4: Now you need to add branches, to show all the tools available in your ecosystem. You can add a branch by clicking on the main node (in step 3 above) and then clicking on the following icon.
Step 5: To differentiate the tools that are (a) available to you, from those that are (b) available to your students and those that are (c) available to both, you may colour code each node by following these simple steps:
- Select the node by clicking on it
- click on the following icon

- click on background and select a suitable colour.
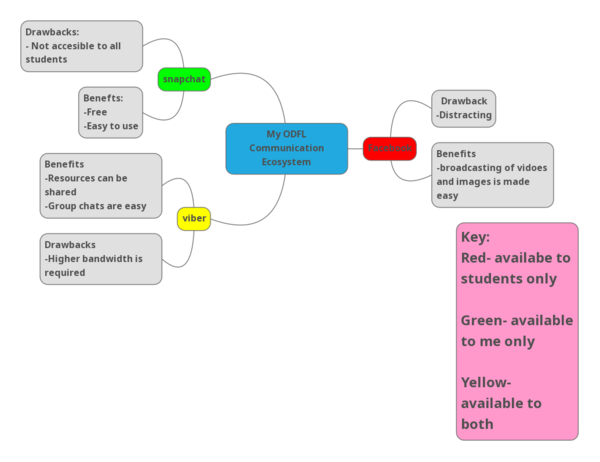
Note: Provide a Key for your colour coding as in the example given below. You can do this by adding a separate node.
Step 6: For each tool, insert 2 other child nodes by clicking on that node and then clicking on the following icon
Specify the following information in each child node:
- why it is a good option to use for communication (benefits)
- some drawbacks of using the tool
Tip: To go to the next line within a node, press shift + enter.
Here is an example of a mind map designed using the steps outlined above.
Step 7: Once you are satisfied with the quality of your mind map, you can download it on your desktop as a pdf. To do this,
- Click on File on the top left-hand corner.
- Select Download as
- Select PDF
- On the dialogue box that appears, click export
- Once exported, another dialogue box will appear. Click Download
- Save the PDF to your computer.
Upload your resource and earn a badge:
You can now upload your mind map to the CS4ODFL Moodle site.
If you’re not sure about any aspect of the learning challenge, please post them to the CS4ODFL Moodle site. [Moodle Enrolment key: ppodl (all lowercase)]
ODFL Ecosystem Badge
To complete this challenge, read the following scenario:
You have been asked to design a course for your online class and you need to select the best educational tool to communicate with your online learners. For this, you need to lay out and analyse your ODFL ecosystem using a mind map. A mind map is a drawing used to show words, ideas, tasks or other things. Everything is written around a word or idea in the middle. This word or idea is the main topic and linking and branching out from this main topic are ideas relating to it.
Task:
The task for this learning challenge is to prepare and upload a mind map, which should clearly show the following:
The Steps (7) for Designing Your Mind Map:
There are many mind mapping softwares available online. You may use any software that you find convenient. However, one free software we suggest is “MindMup”. The instructions below show how you can use the “MindMup” software to design your mind map.
Step 1: Click on this link to access the mind mapping software: https://www.mindmup.com/
Step 2: On the home page, click on “Create a Free Map”.
A mind map deigning pane will open. This is where you will create your mind map.
Step 3: In the first node that appears, double click or press space and type “My ODFL Communications Ecosystem”
Step 4: Now you need to add branches, to show all the tools available in your ecosystem. You can add a branch by clicking on the main node (in step 3 above) and then clicking on the following icon.
Step 5: To differentiate the tools that are (a) available to you, from those that are (b) available to your students and those that are (c) available to both, you may colour code each node by following these simple steps:
Note: Provide a Key for your colour coding as in the example given below. You can do this by adding a separate node.
Step 6: For each tool, insert 2 other child nodes by clicking on that node and then clicking on the following icon
Specify the following information in each child node:
Tip: To go to the next line within a node, press shift + enter.
Here is an example of a mind map designed using the steps outlined above.
Step 7: Once you are satisfied with the quality of your mind map, you can download it on your desktop as a pdf. To do this,
Upload your resource and earn a badge:
You can now upload your mind map to the CS4ODFL Moodle site.
If you’re not sure about any aspect of the learning challenge, please post them to the CS4ODFL Moodle site. [Moodle Enrolment key: ppodl (all lowercase)]
Project lead
Supported by
Development Partner